


Overview
Welcome!
If you're an application developer interested in learning how to use AI to build new kinds of app experiences, you've come to the right place! From April 23rd to May 14th, we're releasing new resources, answering questions online, and live streaming our own projects while we hack on them - all to help you get started putting AI to work in your apps.
Sign up!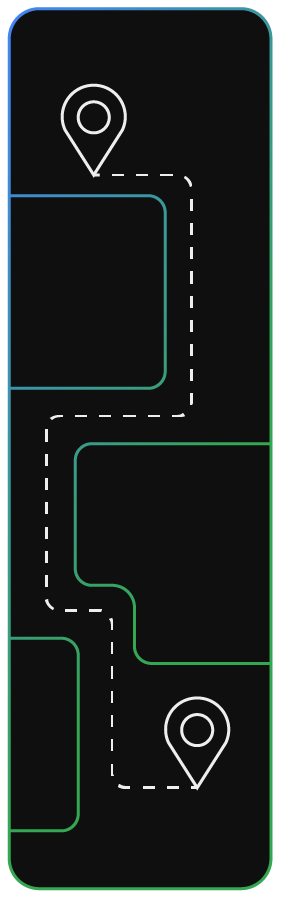
The steps
How to Participate!
We've put together paths for developers of different skill levels and technical backgrounds. Once you've registered for the campaign:
- Pick the path that's right for you.
- Download the starter kit and decide on an idea.
- Hack away, and join us for livestreams and on the forums with questions.
- Register your finished app.
Starter kits
Angular + ViF
Are you someone who knows a little JavaScript and would like to try building a web app that uses an agent? With Angular and Vertex AI in Firebase (ViF), you can build agentive applications for the web using the power of Google's Gemini models, entirely in JS.
Try it!
Starter kits
Flutter + ViF
Are you someone who knows a little Flutter and would like to try building a multi platform app that uses an agent? With Flutter and Vertex AI in Firebase (ViF), you can build agentive applications for the multiple platforms using the power of Google's Gemini models, entirely in Dart!
Try it!
Starter kits
Angular + Genkit
If you're someone who's got an understanding of Angular and would like to learn how to build agents that live on a server, Firebase Genkit could be the right solution for you. Learn how to put an Angular client together with agentic workflows written in TypeScript, Python, or Go. This stack can be fun for both solo hackers and groups!
Try it!
Starter kits
Flutter + Genkit
If you're someone who's got an understanding of Flutter and would like to learn how to build agents that live on a server, Firebase Genkit could be the right solution for you. Learn how to put a Flutter client together with agentic workflows written in Dart.
Try it!Find community!
Event Schedule

Thursday, April 17, 2025
All times in PST
09:00 - 11:00
Observable Flutter Livestream: Agentic Apps with Flutter
Observable Flutter is back! Watch as Craig Labenz is joined by Andrew Brogdon to discuss and explore AI-powered, agentic apps in Flutter.
Speaker(s)
Andrew Brogdon, Developer Relations Engineer
Craig Labenz, Developer Relations Engineer
Friday, April 18, 2025
All times in PST
11:00 - 13:00
Building Agentic Apps with Angular and Genkit live!
Join Devin from the Angular team, as he live codes an AI-powered app with Angular and Genkit that interactively creates graphic novels. This is going to be a fun one... you won't want to miss it
Speaker(s)
Mark Thompson, Developer Relations Engineer
Devin Chasanoff, Developer Advocate
Thursday, April 24, 2025
All times in PST
09:00 - 11:00
Observable Flutter Livestream: Agentic Apps with Flutter
Watch as Andrew Brogdon and Craig Labenz maybe actually write some code this time en route to building an agentic experience in Flutter.
Speaker(s)
Andrew Brogdon, Developer Relations Engineer
Craig Labenz, Developer Relations Engineer
FAQs
Frequently Asked
Questions
What is "Building Agentic Apps with Flutter and Angular"?
"Building Agentic Apps with Flutter and Angular" is a 3-week online learning series designed to educate, inspire, and enable developers to create the next generation of application experiences using Google's tools - agentic apps, which combine LLMs with goals and tools to perform tasks, are becoming crucial for high-quality applications.
When is this happening?
Project submissions for the learning series will be open from April 23, 2025 to May 14, 2025.
Do I need to register to participate?
Yes, you should register and submit your project through the form if you'd like a chance to have your project featured in promotional content for this campaign, and at events like Google I/O, and to receive weekly emails with more learning resources, new content, and more ways to connect with the community.
What do I need to do?
- Register for the campaign
- Pick the path that's right for you (like Flutter + Genkit, or Angular + Vertex AI in Firebase).
- Download the starter kit and decide on an idea.
- Hack away, and join us for livestreams and on the forums with questions.
- Register your finished app
Get started quickly
Starter Kits
We're releasing four open-source Flutter and Angular starter projects with Genkit and Vertex AI in Firebase. They're designed to give you the structure of an agentic experience that you can easily understand, modify, and repurpose.
Pick and download the kit that's right for you, decide on an idea, hack away, and then submit your finished app!
Angular + Vertex AI in Firebase
Flutter + Vertex AI in Firebase

Angular + Genkit
Flutter + Genkit
The Flutter + Vertex AI in Firebase path
In this path you will integrate Gemini API into a Flutter application using Dart code with no need to run any servers. Vertex AI in Firebase takes care of all of the server side management and access control for you.
In this starter kit you will explore the capability of Gemini to interact with a Flutter application, both through updating the application state in response to a user's written conversational requests, as well as responding to a user interacting with the application's UI affordances.
With this starter kit, you can learn how to define the goal for an agent with system prompts, how to use tool calling to give your agent the ability to interact with the outside world, and how to build a user experience around the streaming data provided by your agent.
How Flutter and Vertex AI in Firebase work together
Vertex AI in Firebase makes it really easy to use Gemini API in Flutter. Instantiate a model with FirebaseVertexAI.instance.generativeModel, start a chat session from the resulting model with model.startChat() and then you can use chatSession.sendMessageStream(Content.text(message)) to get a stream of words and function calls from Gemini.
Getting started
To get started with this starter kit, please clone the flutter/demos repo:
$ git clone https://github.com/flutter/demos
In the resulting checked out demos directory, cd into the vertex_ai_firebase_flutter_app directory. Install the flutterfire command, and use it to configure your Flutter application to use Vertex AI in Firebase.
              $ flutter pub global activate flutterfire_cli
              $ rm lib/firebase_options.dart
              $ flutterfire configure
For more detail, please see the README.md file.
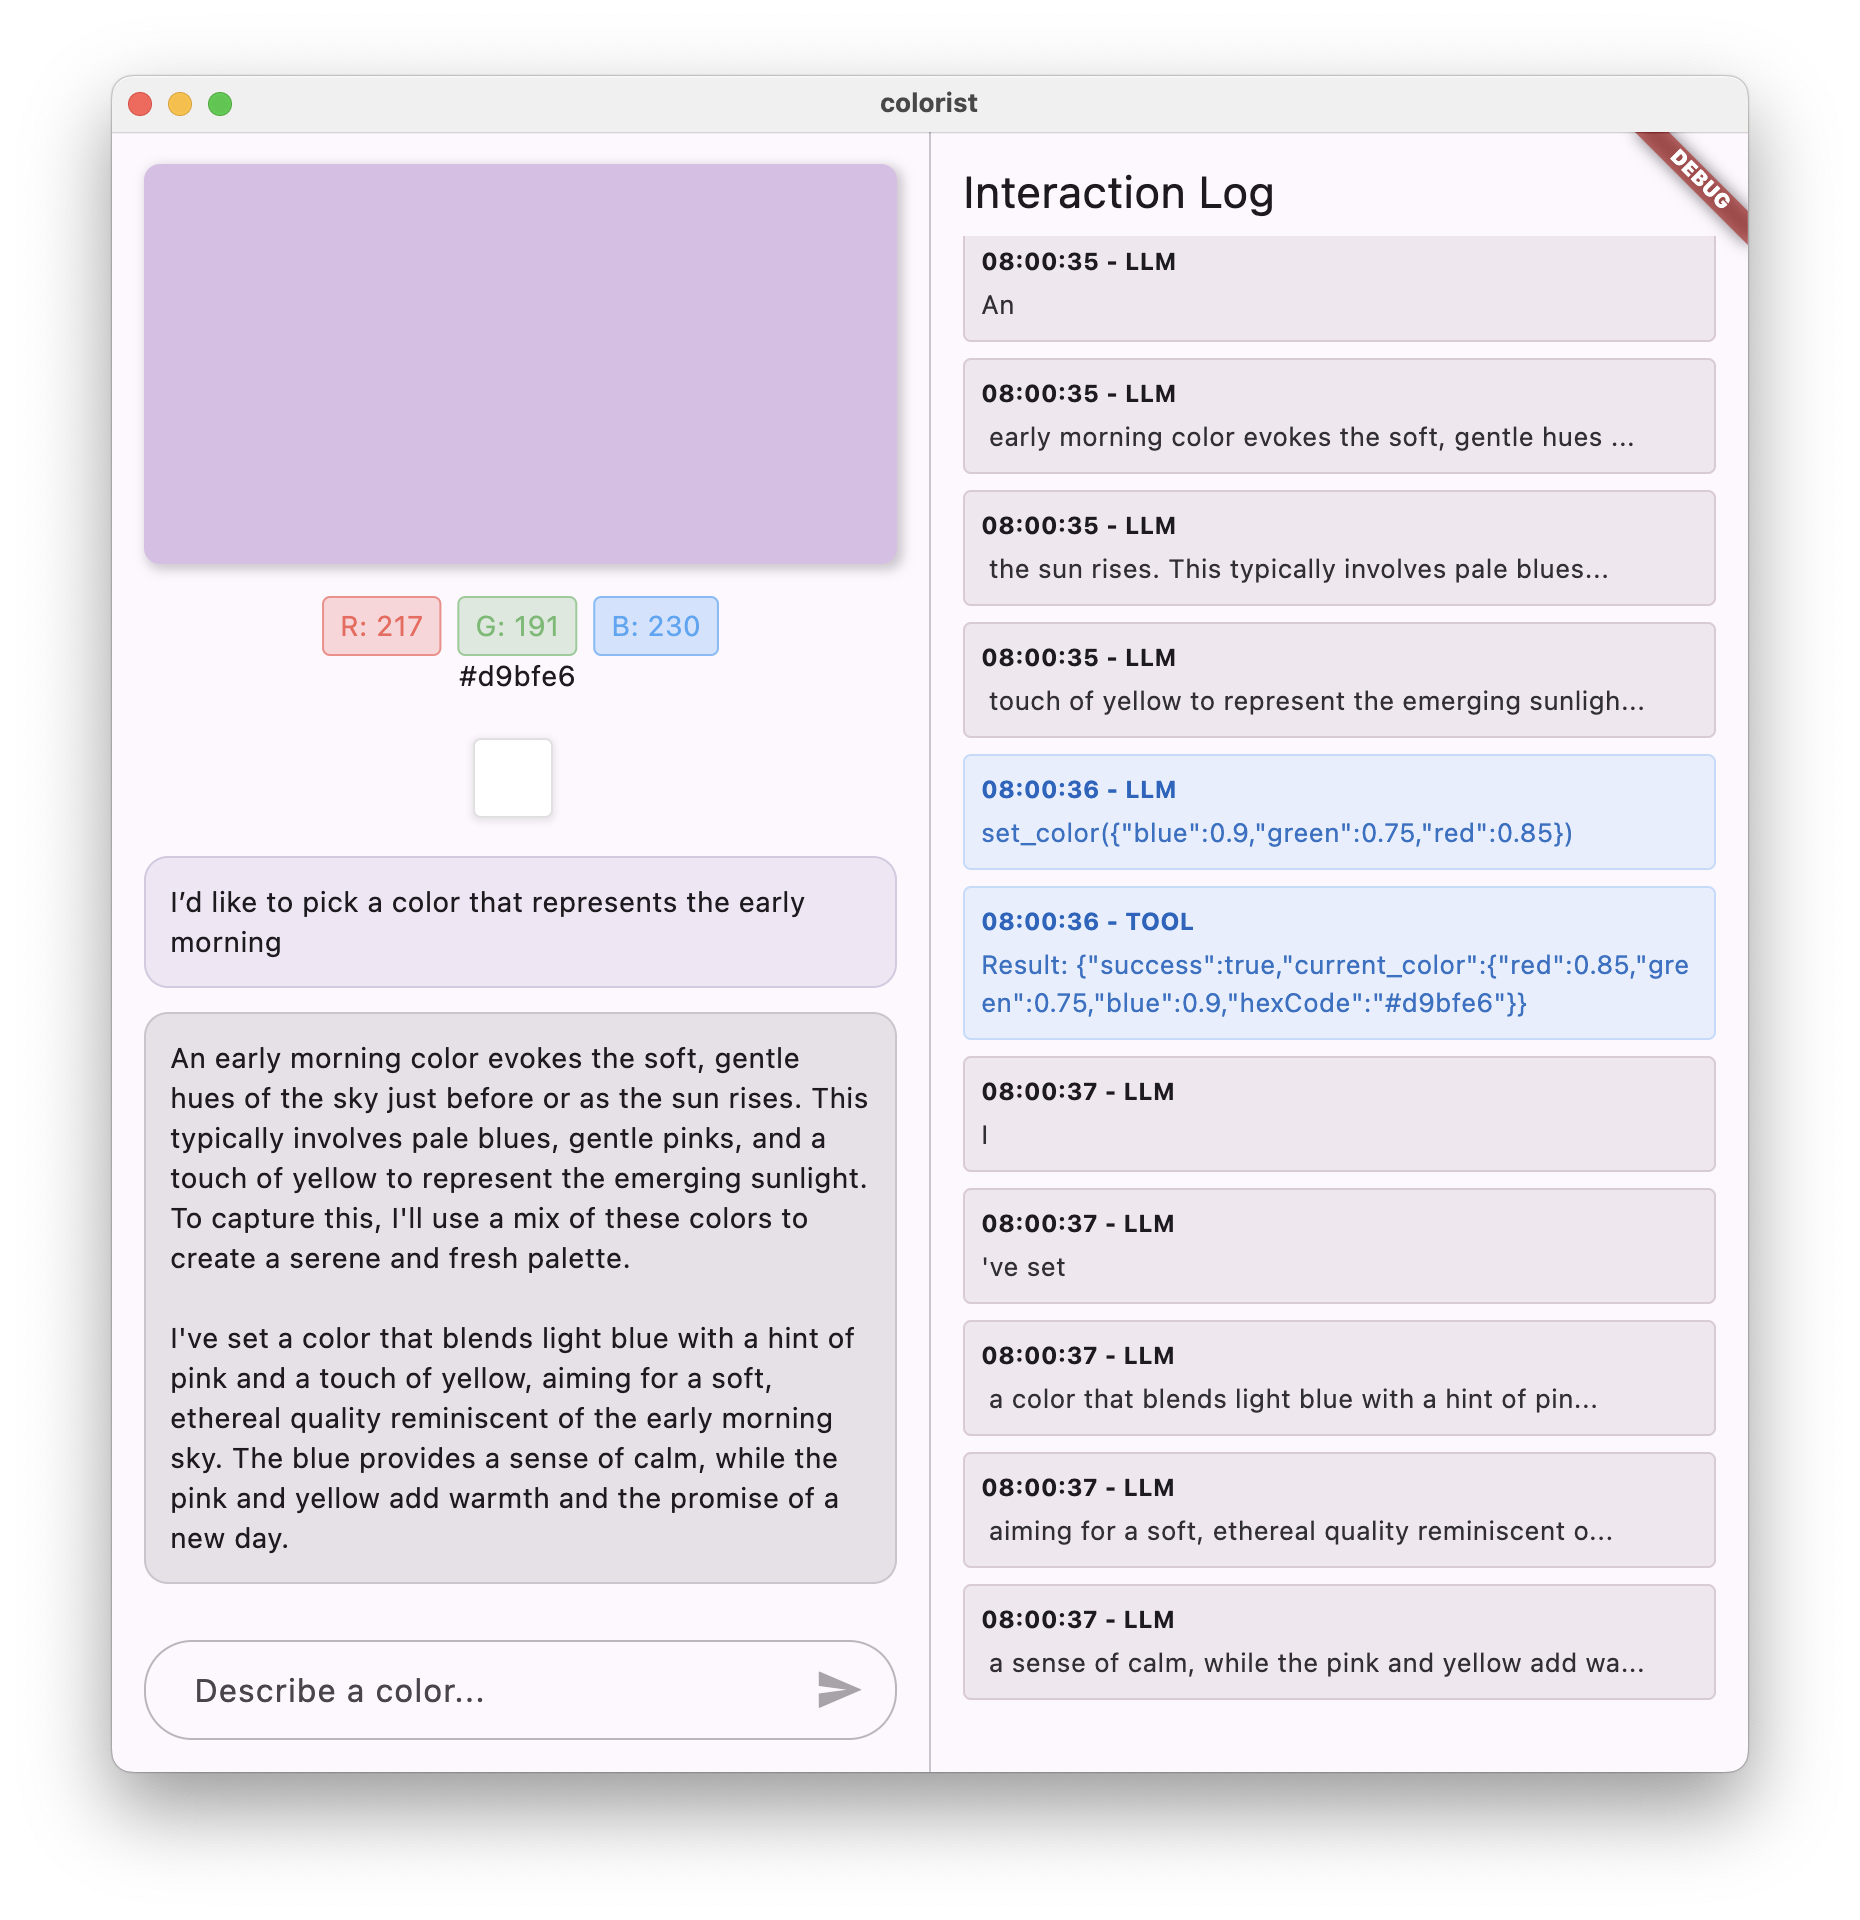
This starter kit shows a minimal integration, exposing only one tool to Gemini, a tool called set_color. The starter kit deals with integration concerns around streaming responses, like making sure the user doesn't start a new conversation thread until the prior one is complete.
You can see how this is implemented in the demo's GeminiChatService sendMessage method. For defining methods, you pass method definitions on generative model instantiation, and then you parse the method calls that come back from Gemini. You can see the implementation of the method declaration in GeminiTools setColorFuncDecl and the parsing of function calls in GeminiTools handleSetColor.
The system prompt required to guide Gemini to use tools, and help users select colors, can be seen in assets/prompts/system_prompt.md. This prompt is loaded into the running Gemini model instance when the model is instantiated in the geminiModel function.
Extending the tools exposed to Gemini involves creating more function definitions, adding them to the Gemini model, parsing the function calls returned from Gemini, and most importantly, updating the System Prompt to explain how the LLM should utilise the newly added functionality.
The starter kit also shows a low level trace of the conversation between the LLM and the application, so you can better understand when and how function calls are integrated into the conversation.
If you want a guided tour of how this codebase was built, please feel free to explore the Build a Gemini powered Flutter app codelab. You can review the documentation for Vertex AI in Firebase, with specific attention on the Function calling using the Gemini API section.
Link to machine setup instructions
After you've cloned the starter kit, you just need Flutter and Firebase on your machine. If you haven't already, follow these Getting Started guides to get the right tools in place:
Then follow these instructions to create a project:
- Create a Firebase project via the Firebase Console.
- Add Firebase to your Flutter app using
flutterfire configure.
Some ideas to try
A couple of ideas for ways you can extend this codebase:
- Color palette generation: Add a function for generating matching or complementary colors
- Voice input: Integrate speech-to-text for verbal color descriptions
- Color history management: Add functions to name, save, or delete colors
- Export capabilities: Allow users to export colors to different formats
- Advanced analytics: Track which color descriptions are most difficult for the LLM to interpret
Register your app when you're finished!
We'd love to see what you build, so use this form to register your app after you're done.
More ways to learn
We've got a lot of resources to help you get started and grow with Flutter and AI:
- Explore the Build a Gemini powered Flutter app codelab.
- Review the documentation for Vertex AI in Firebase
And if you find yourself stuck, connect with the other folks in the Flutter community online and in person!
The Flutter + Genkit path
Vertex AI in Firebase SDK is a great way to start building agentic apps with Flutter. It's serverless so you don't need to manage your own infrastructure. You can integrate it into your Flutter app by adding the firebase_vertexai from pub.dev, so your code is written in Dart directly within your Flutter project. It has AppCheck integration to protect from API abuse by unauthorized clients. If you want to get started quickly with building agentic apps in Flutter, Vertex AI in FIrebase is the way to go.
If that's the case, when and why might you consider a Flutter + Genkit project, instead?
First, the Vertex AI in FIrebase SDK is limited to only a few models at the time of this writing: Gemini & Imagen. You don't have access to any of the other LLMs that are available. Vertex AI in Firebase is tightly coupled with your Flutter app and if you need to make changes to the data flow in the agentic experiences that you've built, chances are you'll have to ship an updated version of the entire client app.
Genkit is an open-source toolkit designed to help you build AI-powered features in web and mobile apps. Its primary strength is its versatility and flexibility. Genkit offers a unified interface for integrating AI models from Google, OpenAI, Anthropic, Ollama, and more, so you can explore and choose the best models for your needs.
Genkit is a server-side toolkit, so you can make changes on the fly and end-users won't notice as long as the client-facing APIs stay the same. Additionally, because Genkit flows are deployed as standard HTTPS endpoints - either on a server or serverless - Genkit flows can be reachable by any client that can make a network call.
Finally, it also comes with support for a number of popular server-side languages: JavaScript, Python, and Go.
Whether you're building chatbots, intelligent agents, workflow automations, or recommendation systems, Genkit handles the complexity of AI integration so you can focus on creating incredible user experiences.
With the starter kit below, you can build something like this:
My Packing List: Pack Smarter, Not Harder.
Stressed about packing? Forget essentials? Wish someone could just do it for you? Say hello to My Packing List!
Tell the app:
- Where you're going.
- How long you'll be there.
- Any attire needs (like "business formal" or "beach casual").
Our smart agent fetches the latest weather forecast for your destination and generates a personalized packing list tailored precisely to your trip!
But wait, there's more!
- Interactive Checklist: Easily track what you already have packed. Customizable prompts and tools.
- One-Tap Shopping: Missing a few items? Tap the "Buy Missing Items" button, and the agentic app handles the shopping for you! (Note: This demo simulates the shopping bit. Sorry, you won't be getting any Hawaiian shirts from building this app.)

How Flutter and Genkit work together
First, Flutter
This is the app that your developers will build and interact with. The diagram shows screens for retrieving information and presenting users with information, filling out a packing list, and asking the agent to complete a purchase.
Now, Genkit
This is where the "brains" of the app lives. When the Flutter app sends a request with some data to the Genkit backend, it's sent to a specific “flow” to handle the tasks. The flow processes the data and sends back a response to the Flutter app. Tools are specialized helpers that a language model can use to perform specific tasks to accomplish its goal. Language models are limited in knowledge to their training data, so tools give them the ability to interact with things with the “outside world.” Such as, retrieving real-time data or executing an action. Tools are often wrappers around other APIs and functions.
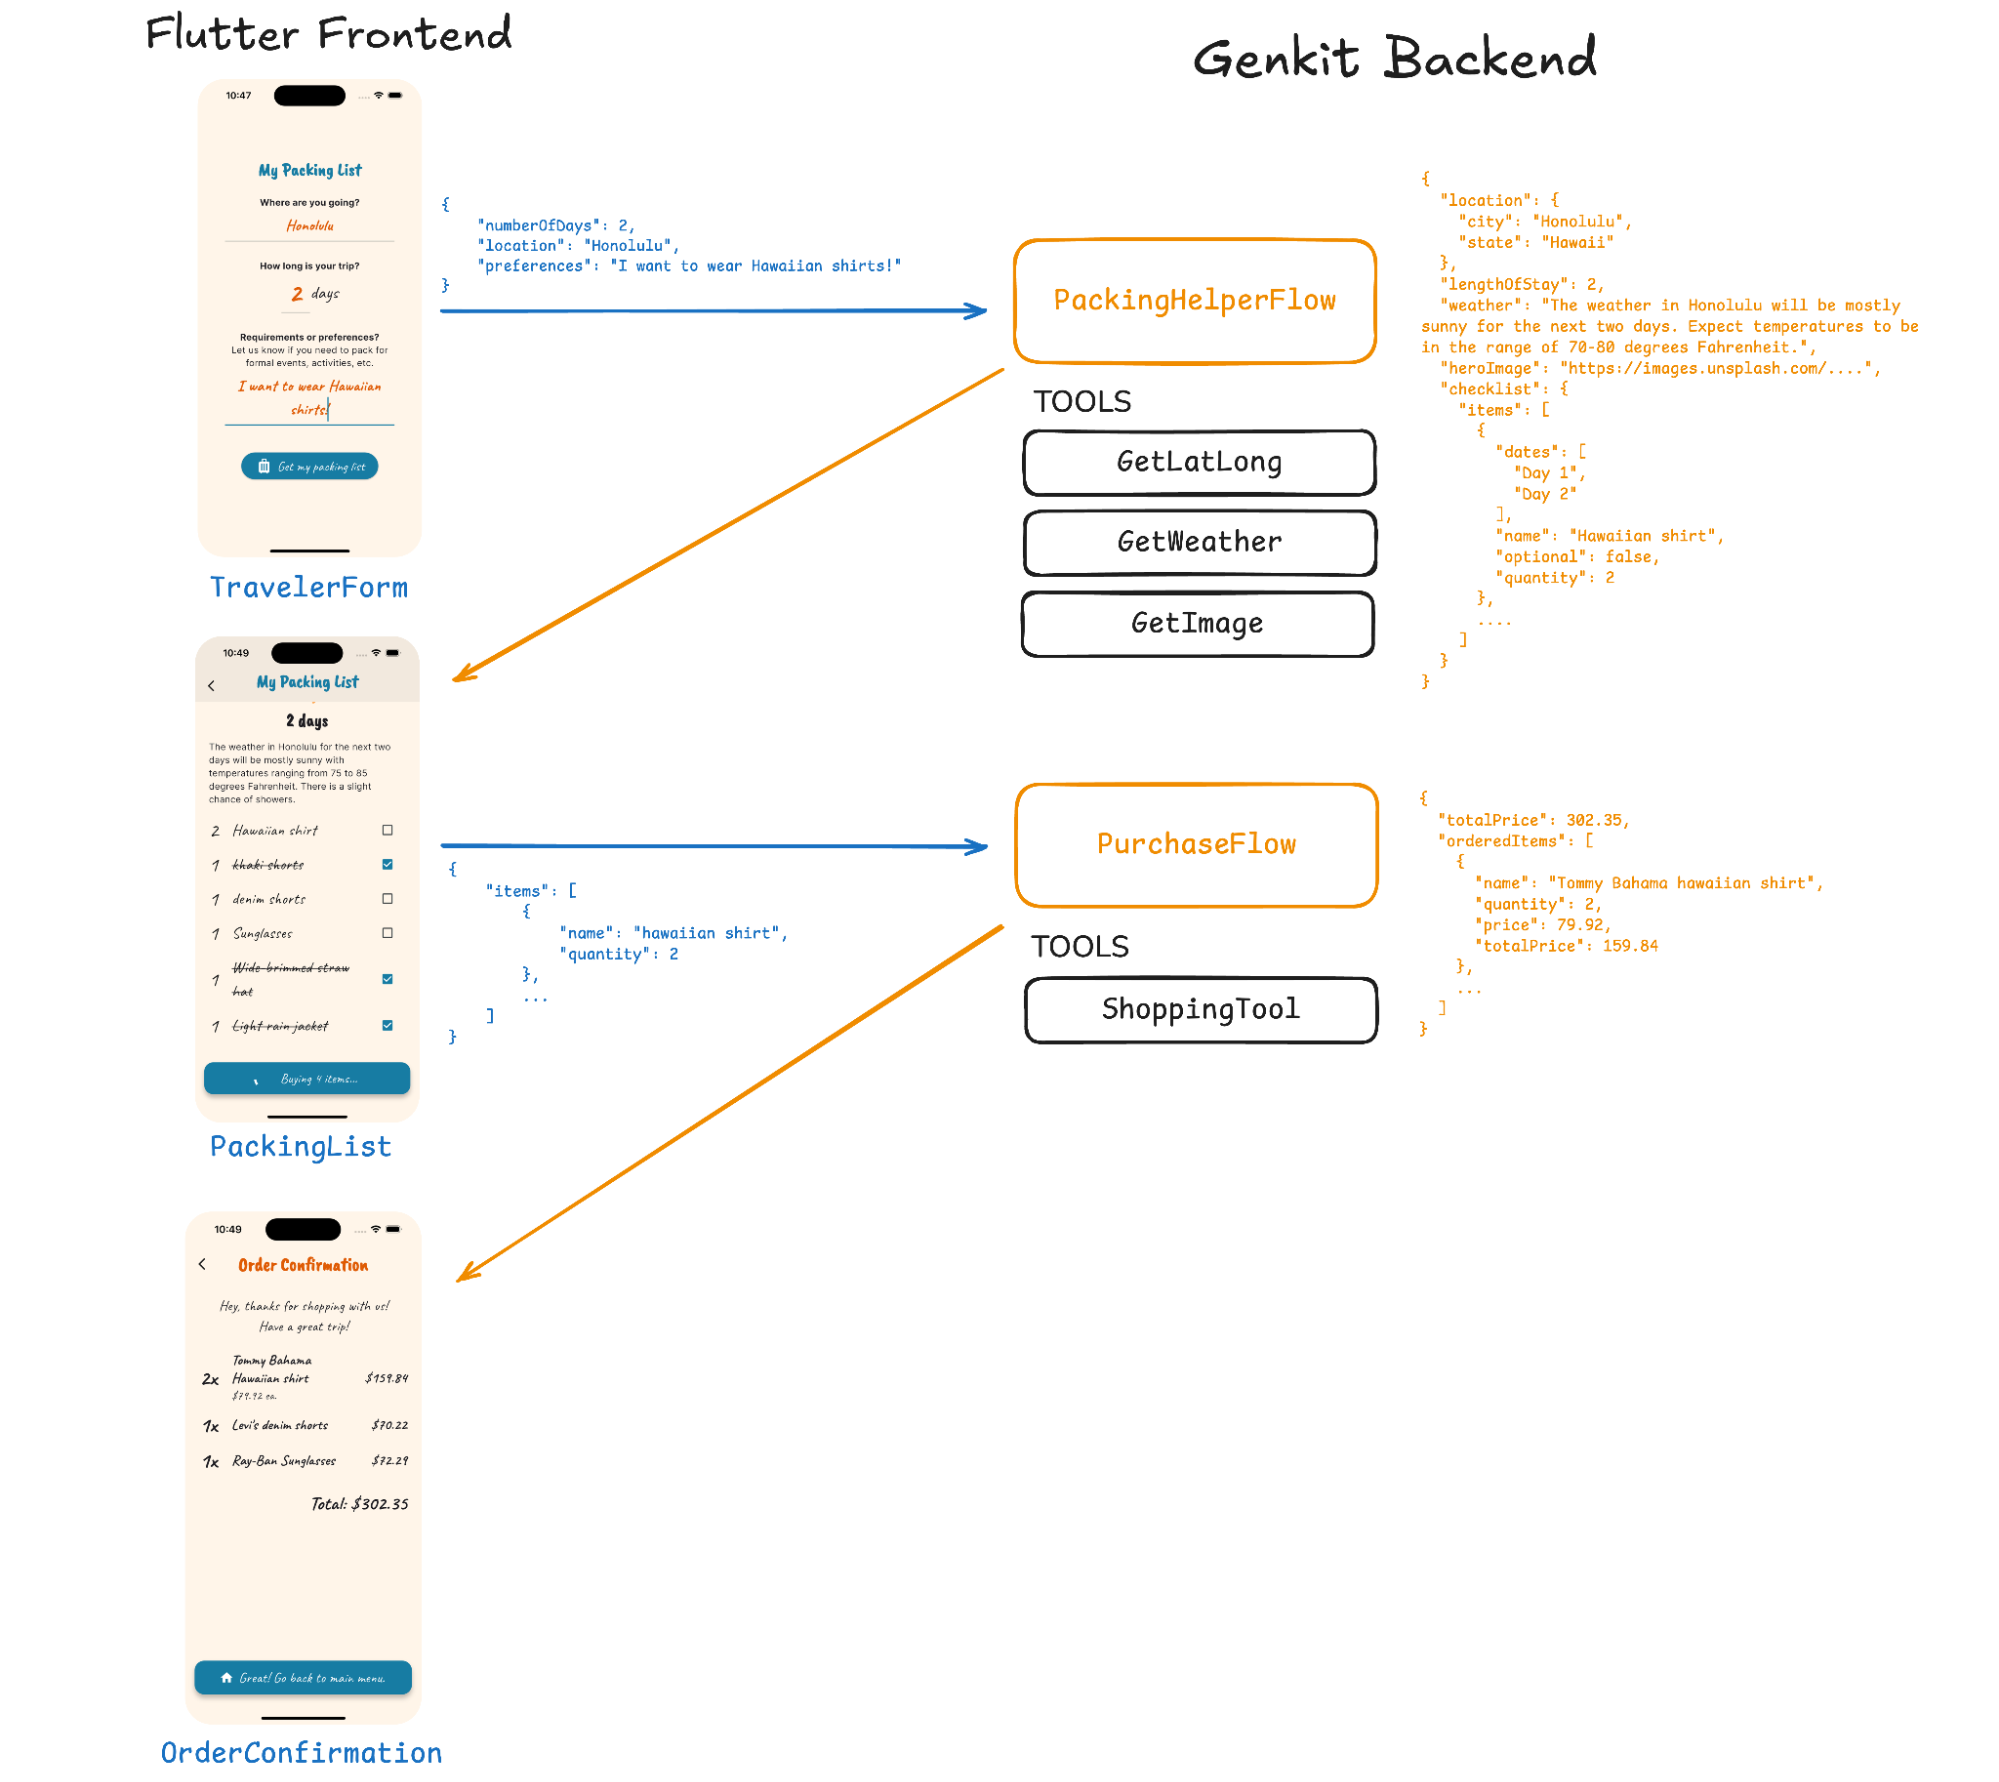
Finally, putting it all together…
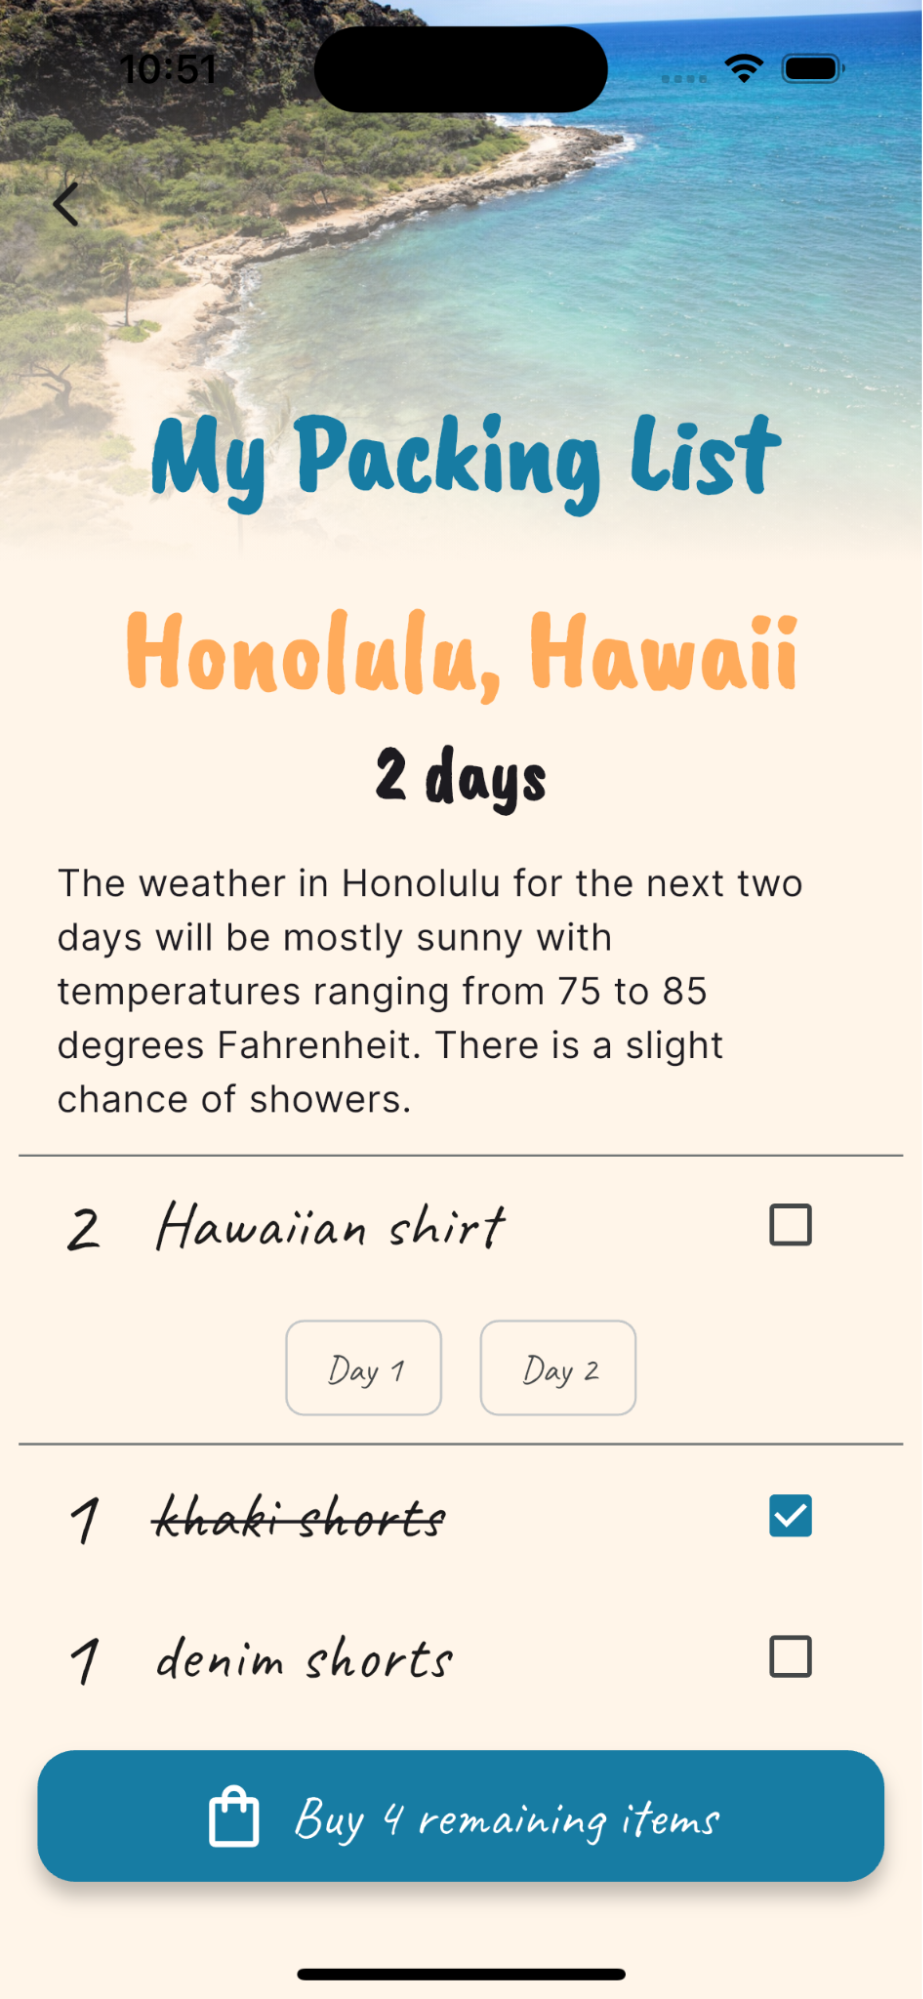
User Provides Trip Details: The user opens the Flutter app and navigates to the packing list feature. They input their destination ("Honolulu"), trip duration ("2 days"), and any preferences ("I want to wear Hawaiian shirts!") on the home screen and taps a button to generate a packing list.
App Requests Packing List: The Flutter app takes this information, formats it into JSON, and sends it to the Genkit backend, specifically invoking the PackingHelperFlow.
Backend Generates List: The Genkit backend receives the request. The PackingHelperFlow runs, using tools to get the location's coordinates (GetLatLong), fetch the weather (GetWeather), and find an image (GetImage). It then processes this data, along with the user's preferences, to generate a suggested packing checklist.
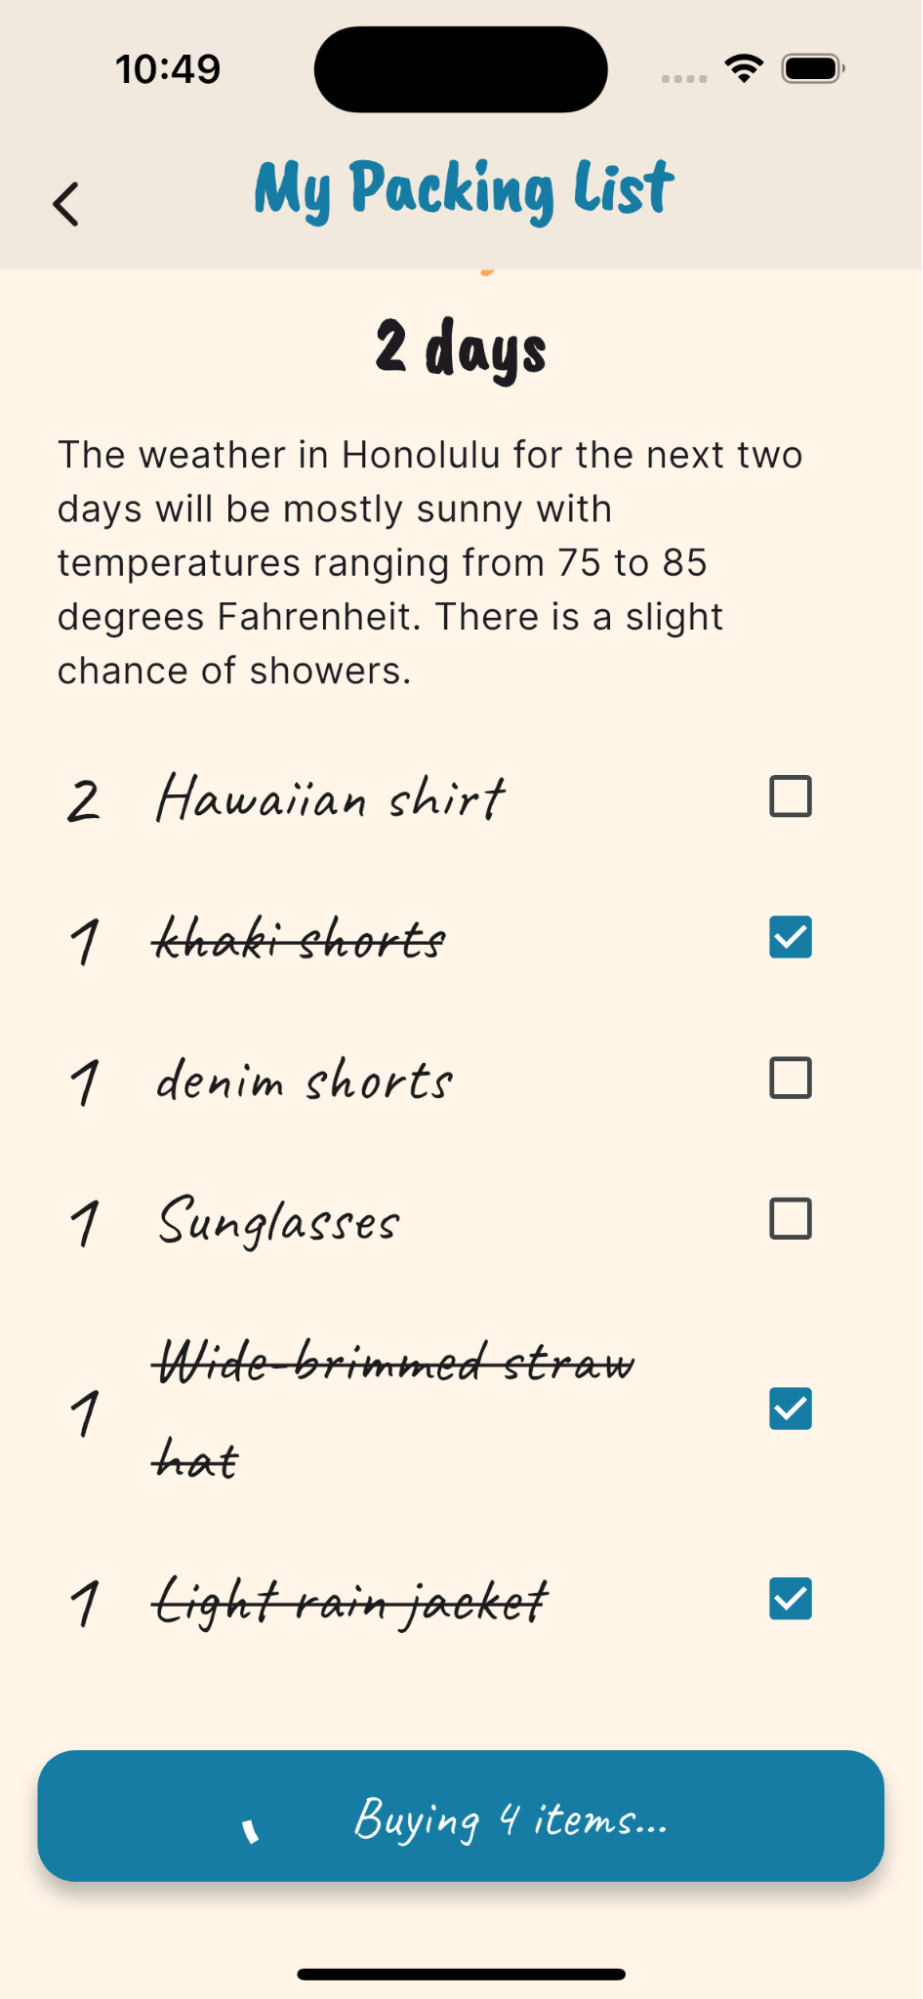
App Displays List: Genkit sends the generated checklist, weather info, and image URL back to the Flutter app as JSON. The app parses this data and displays the second screen, showing the user their personalized packing list (e.g., "Hawaiian Shirt: 2").
User Decides to Purchase: The user checks off all the items that they have on their list and they can tap a button to tell the agent to initiate a purchase of the remainder of the items.
App Requests Purchase: The Flutter app takes the selected item(s) (e.g., Hawaiian shirt, quantity 2), formats this into JSON, and sends it to the Genkit backend, this time invoking the PurchaseFlow.
Backend Processes Purchase: The Genkit backend receives the purchase request. The PurchaseFlow runs, using the ShoppingTool to find specific product details, confirm pricing, and calculate the total cost, simulating an order.
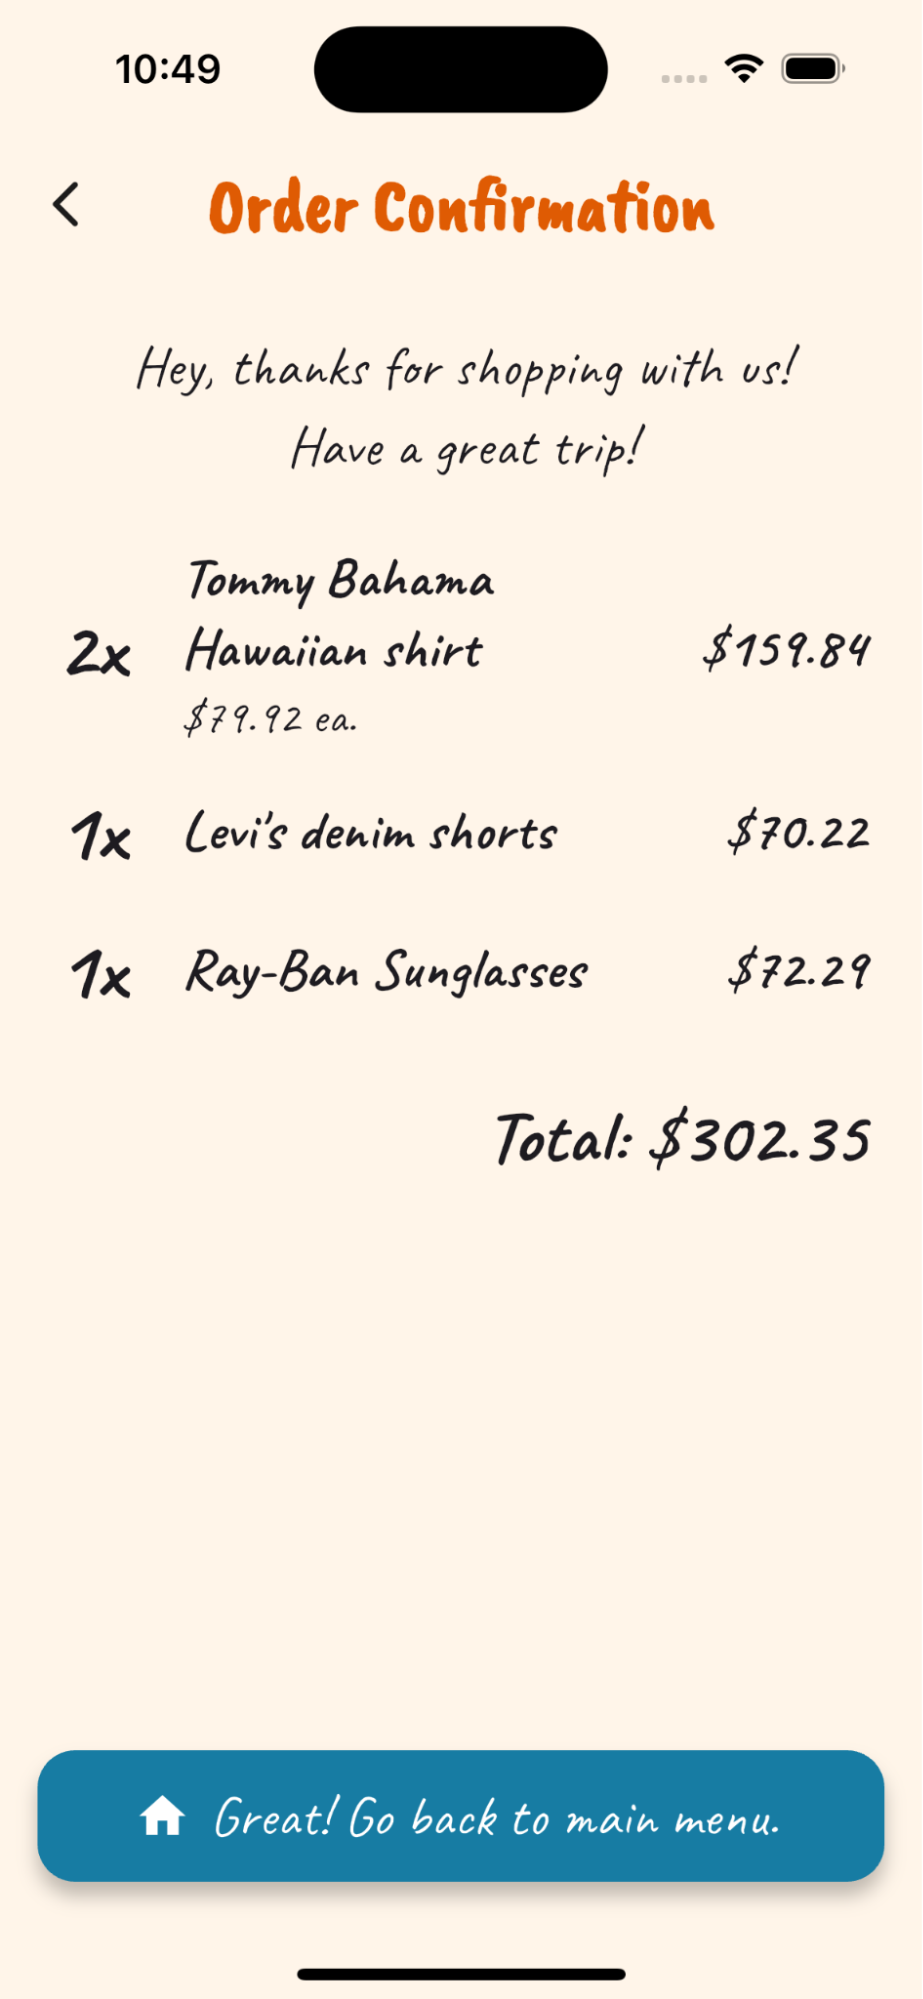
App Displays Confirmation: Genkit sends the order confirmation details (items ordered, prices, total cost) back to the Flutter app as JSON. The app parses this and displays the final screen, showing the user their order confirmation and total ($302.35).
Getting started
Get the code: genkit_flutter_agentic_app is available on GitHub.
Flutter App
UI
TravelerFormScreen:This screen collects the user's trip destination, duration, and preferences to initiate the packing list generation.PackingList Screen:This screen displays the generated packing checklist items and quantities based on the trip details received from the backend.OrderConfirmationScreen:This screen shows the confirmation details, including items purchased, prices, and the total cost, after the “agent” completes a purchase on the user's behalf.
Models
Each model represents data in the app, these tend to match up to a particular screen
TravelerFormModel:The model used to store data relating to the user's upcoming trip.ItemModel:A model representing an item that needs to be packedPackingListModel:A model that represents a user's packing list, including a list of ItemsOrderConfirmationModel:A model that represents an order confirmation
Connecting to Genkit
Genkit is a helper class that manages and abstracts away the Genkit Flow (network) calls to the Genkit backend server. It also handles parsing of the responses. So unless there's an error, these methods return an object such as OrderConfirmationModel and PackingListModel which can be used immediately by the app.
Genkit
Flows
There are two flows included in the starter kit. You can add additional flows or adjust the prompts that are already there for each flow:
-
PackingHelperFlow:This flow receives JSON from the Flutter app containing the user's input (destination, duration, preferences). It uses various tools (see below) to get the weather forecast for the user-provided location. It generates a list of outfits based on the user input, itemizes it, uses another tool to get a Hero image for the location, then bundles everything up and sends it back to the Flutter app. -
PurchaseFlow:The flow receives a list of items that the user wants to buy. For each item, the “agent” uses the ShoppingTool to look for the item from a popular brand and purchase it on the user's behalf. It sends back a JSON confirmation including total price and details of each ordered item (name, quantity, individual price, total price for that item). The Flutter app uses this to display the order confirmation screen.
Tools
There are 4 tools included in the Genkit & Flutter starter kit. Each tool is entirely modular, you can modify these however you see fit to see fit for each use case:
-
GetLatLong:Takes the location string, such as "Honolulu" and calls a geocoding API to get precise latitude and longitude -
GetWeather:Takes location coordinates (from GetLatLong) and calls a weather API to get the forecast ("mostly sunny... 70-80 degrees") -
GetImage:Use the location name to search an image API for a relevant photo. -
ShoppingTool:Makes a call to a hypothetical e-commerce/shopping API where it finds the product, and simulates placing an order for that product.
Code Repo Breakdown
            flutter_frontend/
            ├─ pubspec.yaml # Flutter app dependencies
            ├─ analysis_options.yaml
            ├─ lib/
            │  ├─ models/ # Data models that are used throughout the app
            │  │  ├─ item_model.dart
            │  │  ├─ packing_list_model.dart
            │  │  ├─ order_confirmation_model.dart
            │  │  ├─ traveler_form_model.dart
            │  ├─ screens/ # All of the screens in the app
            │  │  ├─ components.dart
            │  │  ├─ order_confirmation.dart
            │  │  ├─ packing_list.dart
            │  │  ├─ traveler_form.dart
            │  ├─ settings/
            │  │  ├─ config.dart # Configure Genkit Server endpoint
            │  │  ├─ styles.dart
            │  │  ├─ theme.dart
            │  ├─ main.dart # Flutter client app's entrypoint
            │  ├─ genkit.dart/ # Class for making network calls to Genkit
            genkit_backend/
            ├─ src/
            │  ├─ ai.js # Configure a Genkit instance
            │  ├─ app.js # Genkit app server's entrypoint
            │  ├─ config.js # Pulls API keys from environment variables
            │  ├─ tools/ # Tools / Function Calls
            │  │  ├─ latlong.js
            │  │  ├─ shopping.js
            │  │  ├─ unsplash.js
            │  │  ├─ weather.js
            │  ├─ flows/ # Flow definitions
            │  │  ├─ purchase.js
            │  │  ├─ packingHelper.js
            ├─ package.json # Node dependencies
Link to machine setup instructions
After you've cloned the starter kit, you just need Flutter and Firebase on your machine. If you haven't already, follow these Getting Started guides to get the right tools in place:
You'll need 3 different API keys to get this starter kit up and running:
- A Gemini API Key (Required for using Gemini model)
- An OpenWeather API Key (Required for LatLong and Weather tools)
- An Unsplash Developer Access Key (required for the Unsplash tool)
Some ideas to try
Ready to get building your agentic Flutter + Genkit app? Here are a few ideas:
Small changes:
- Adjust some of the existing prompts to get different output and behaviors
- Modify a flow: Can you make one of the flows return some additional information that it doesn't already?
- Modify one of the tools to get different data or take a different action.
Medium changes:
- Add another flow. What might the third flow do after the user receives their order confirmation?
- Add another tool that would be helpful for the agent to use
- Integrate the shoppingTool with a real shopping API
- Genkit gives you the flexibility to access different LLMs, so maybe try a different model.
Large changes, remix the app entirely:
- A travel planning app that generates a vacation itinerary based on user preferences, the weather and the local tourist attractions. How would the app find and book local attractions?
- A cooking helper app that generates recipes based on user preferences and available ingredients. How might the app go about determining what ingredients are available, could the user just take a picture of their fridge? How might the app help users get additional ingredients?
- Integrate the shoppingTool with a real shopping API
- Think of everyday problems that could be solved with an agentic app.
Remember, once you've updated your Genkit backend… Update your Flutter app too! The starter kit version looks a little bit like a travel influencer meets Flutter app developer. So go ahead and load it up with some new data, fix up the widgets, put a new coat of paint on it, do whatever you want, but most importantly make it your own!
Register your app when you're finished!
We'd love to see what you build, so use this form to register your app after you're done.
More ways to learn
This starter kit only scrapes the surface of what you can build with Flutter & Genkit. There are more powerful features including:
- Interrupts to pause generation and return control back to the user. Then, resume generation again when ready.
- RAG (Retrieval-augmented generation): A technique used to incorporate external sources of information into an LLM's responses.
Ready to dive deeper into more Flutter + Genkit? Check out these other projects:
- Compass AI Travel Planning App: This is a travel demo using Flutter, Genkit, and Firebase Data Connect to find ideal itineraries from a database of travel plans.
- Green Thumb App: The Flutter Fix-in Warehouse sample demonstrates using Flutter and Genkit together to build a generative AI with the following features: server-side tool calls, server-to-client tool calls (aka Genkit interrupts), Retrieve Augmented Generation (aka RAG)
The Angular + Vertex AI in Firebase path
Web developers everywhere are excited to build the next great web application but often don't know which path to take or where to start. Vertex AI in Firebase provides a secure way to interact with models provided by Vertex AI from your web client.
Choose this path if:
- You are familiar with JavaScript (or TypeScript)
- You want to build client-side agentic experiences
Keep in mind that this is for client-side apps, if you want to connect to models like Gemini from the server side, consider using Genkit, for example.
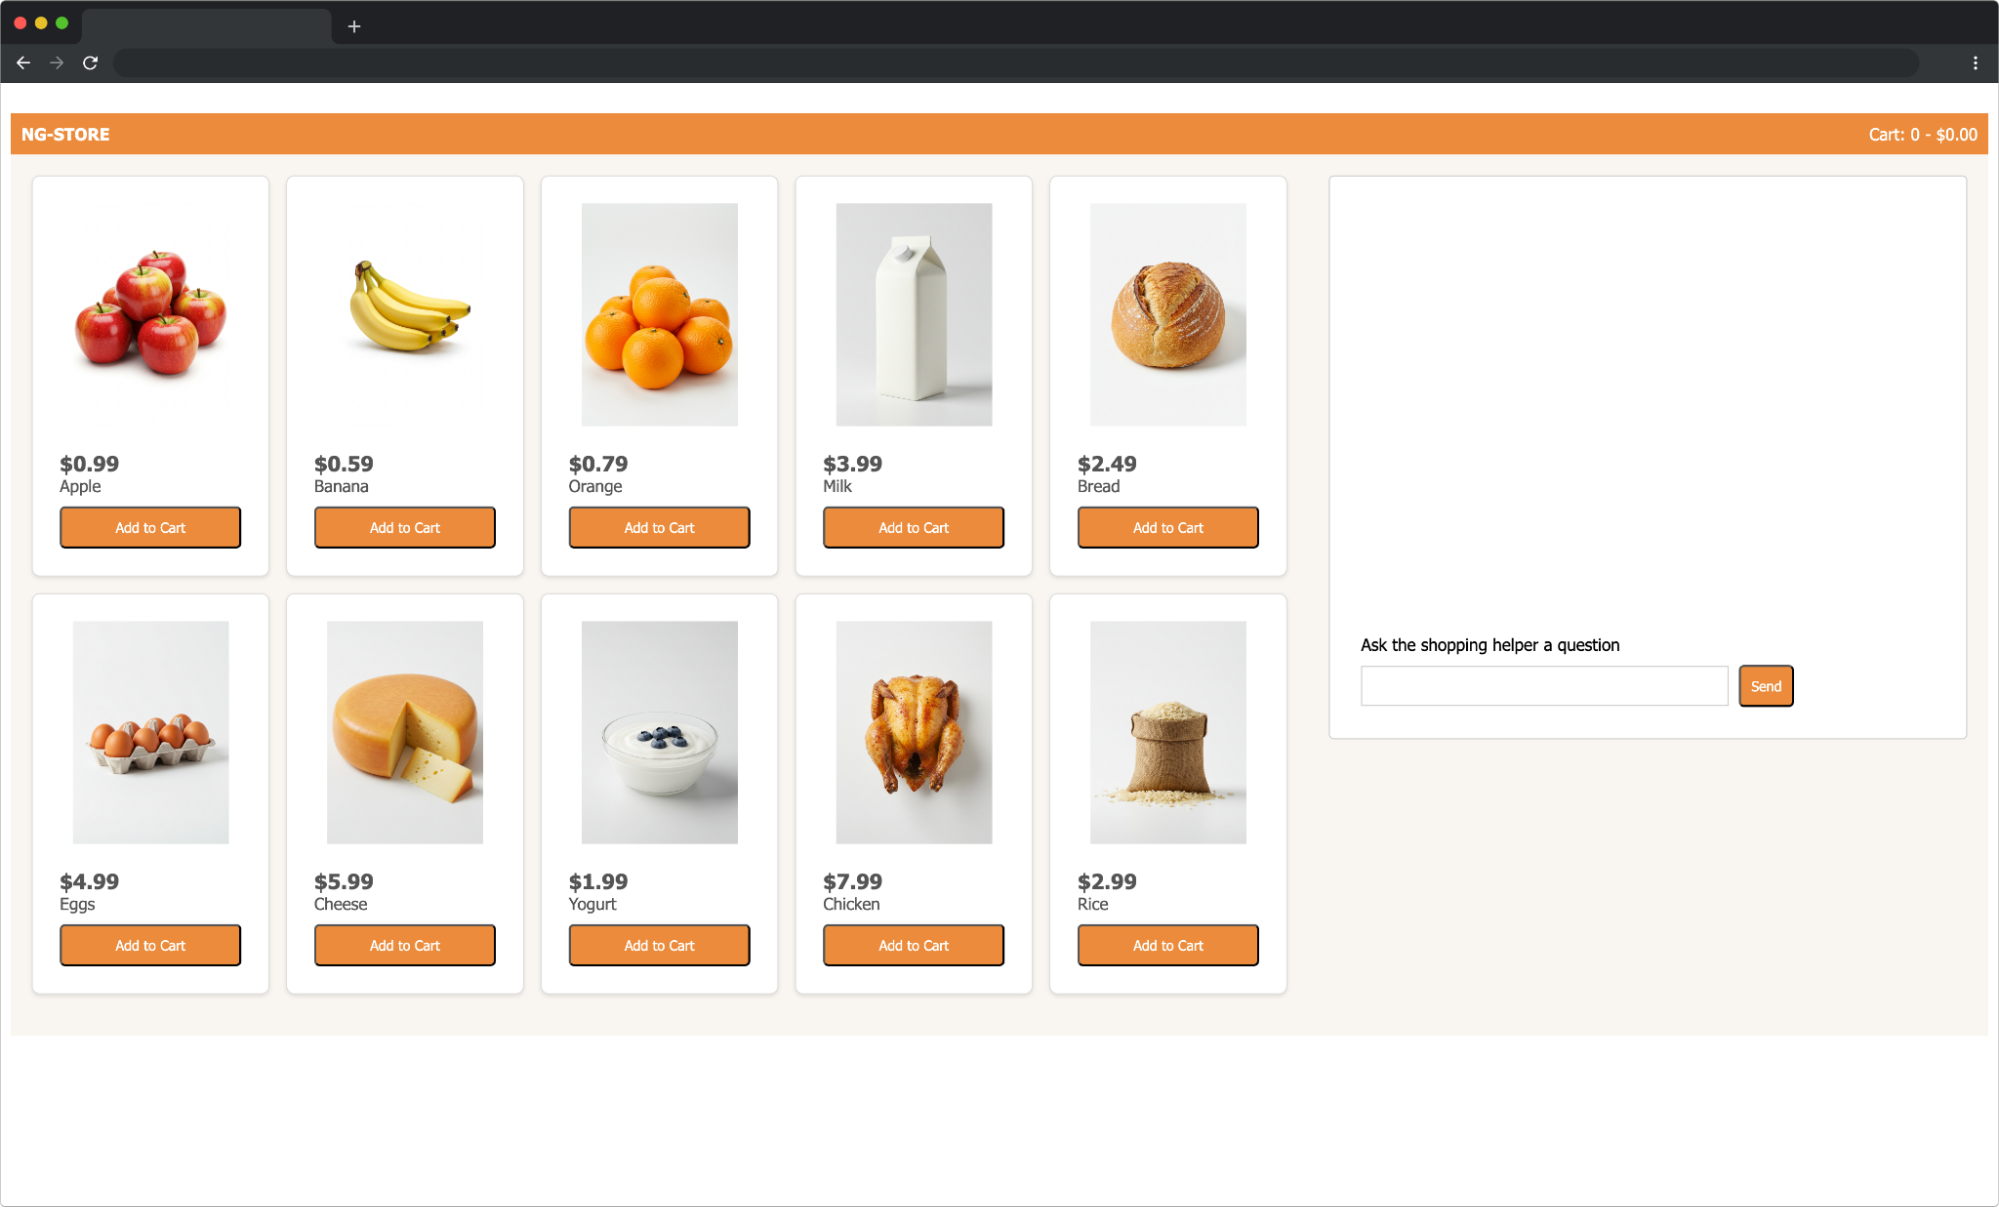
Here's what you get with the starter kit below, you can build something like this e-commerce store that includes a helpful agent that will answer questions and perform some actions for you via chat.
How Angular and Vertex AI in Firebase work together
Since Angular is a framework for building web applications, it will serve as your user interface (UI). Using the Firebase library for Angular (AngularFire) the application connects to the Firebase project. With the Vertex AI in Firebase functionality, it is possible to connect to a model to start a chat session and use tools to empower the agent to perform actions.
Getting started
The code is available on GitHub and you'll just need to ensure that you have Angular and node installed on your computer.
Once you have the coding tools installed, you'll need to do some setup with Firebase to get access to Vertex AI in Firebase.
- Follow the directions for Step 1 to create a project and a web app. You don't need to add any SDKs, we've done that step for you.
Here's how to get started locally - first get the code by cloning the repository:
              # Clone using a password-protected SSH key.
              git clone git@github.com:angular/examples.git

              # Clone using the web url
              git clone https://github.com/angular/examples.git
Once the code has been downloaded to your local machine (or opening in a cloud IDE like Firebase Studio) navigate to the project directory and install the dependencies:
              # Navigae into the project directory
              cd examples/vertex-ai-firebase-angular-example

              # Install the dependecies for the example.
              npm install
Before you can start this example, you'll need to make a code change:
In src/environments.ts add your project settings from the Firebase Console.
              export const environment = {
                  production: false,
                  firebase: {
                      apiKey: "<api-key>",
                      authDomain: "<your-app-domain>",
                      projectId: "<insert-project-id>",
                      storageBucket: "<storage-bucket-id>",
                      messagingSenderId: "<message-sender-id>",
                      appId: "<app-id>",
                      measurementId: "<measurement-id>"
                  },
              };
Once you've completed the setup steps required for the application - you can run it by starting the development server from the command line:
ng serve
Your app will be available at http://localhost:4200.
With the app running, try asking some of the following questions to the shopping agent:
- What items are in stock?
- What is the most expensive item?
- Are there any vegetarian options?
How the app works
This example uses a few Angular features to engage with the Vertex AI in Firebase API. Primarily, the src/ai.service.ts file contains the call to Vertex AI:
const vertexAI = getVertexAI(this.firebaseApp);
In this example, we've given the agent access to some tools to be able to further expand its capabilities. The two tools it can use are getting access to the inventory and adding items to the cart.
These are functions that were implemented for this example and provided to the agent via the tools property of the getGenerativeModel function.
The main component is located in src/app.component.ts - if you'd like to further investigate the code, you should review the code in this file.
Some ideas to try
This starter kit is just that - a place to start. You can go further in this example by implementing some additional tools such as:
- Filtering the UI to match the conversation with the agent (e.g, show me only vegan options filters the UI to display only vegan options).
- Build a full checkout flow so that the agent can not only add items to the cart, but can initiate the checkout process.
There are even more agentic apps available to check out on Angular's Github page.
Register your app when you're finished!
We'd love to see what you build, so use this form to register your app after you're done.
More ways to learn
We've got a lot of resources to help you get started and grow with Angular and AI:
And if you find yourself stuck, connect with the other folks in the Angular community online and in person!
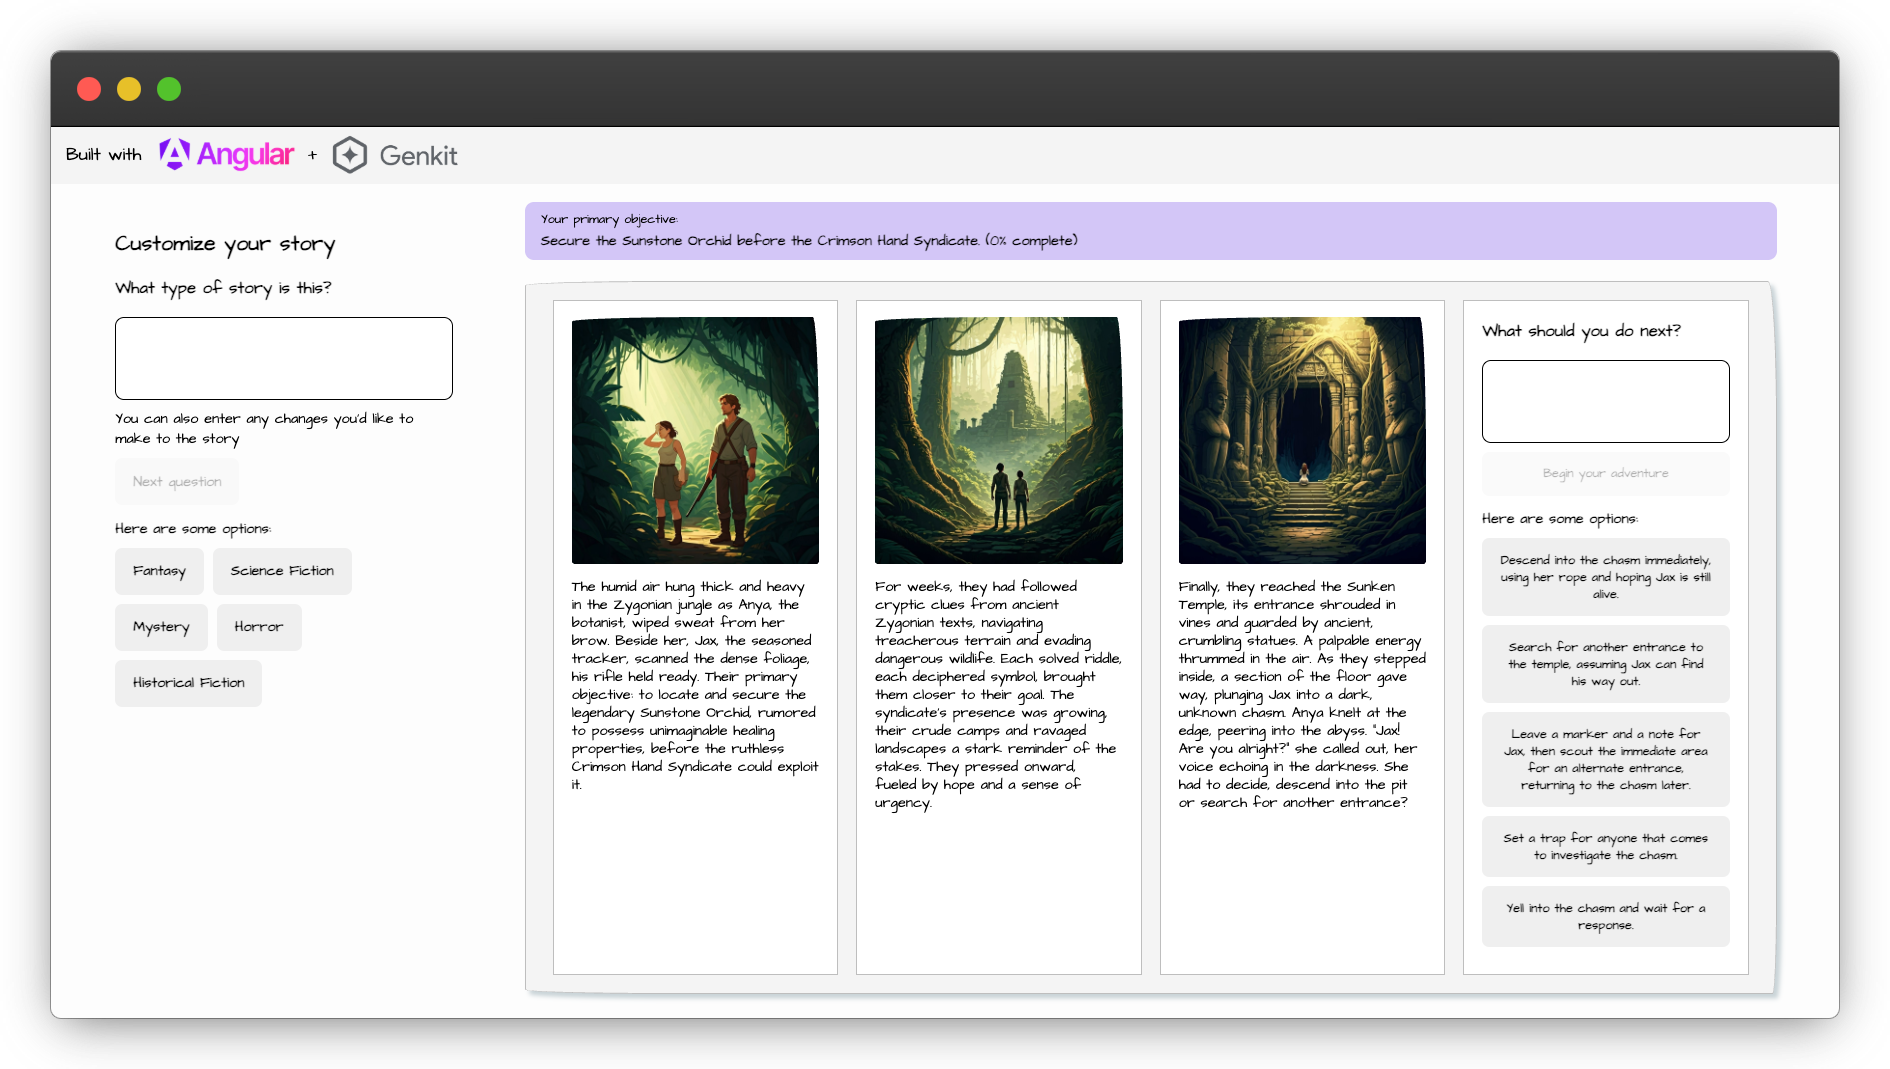
The Angular + Genkit path
Angular and Genkit are a powerful combination for creating full stack applications powered by Gemini.
Genkit is an open-source framework designed to simplify the entire lifecycle of building, deploying, and monitoring generative AI applications, particularly using JavaScript and TypeScript, though Genkit offers support for Python and Go as well. It provides a high-level abstraction, focusing on developer experience and rapid iteration.
Angular is a web framework that empowers developers to build fast, reliable applications.
Angular offers a number of features that streamline integration with Genkit including
- An API for reactively consuming asynchronous data
- Server routing that makes it easy to expose Genkit flows to a client application
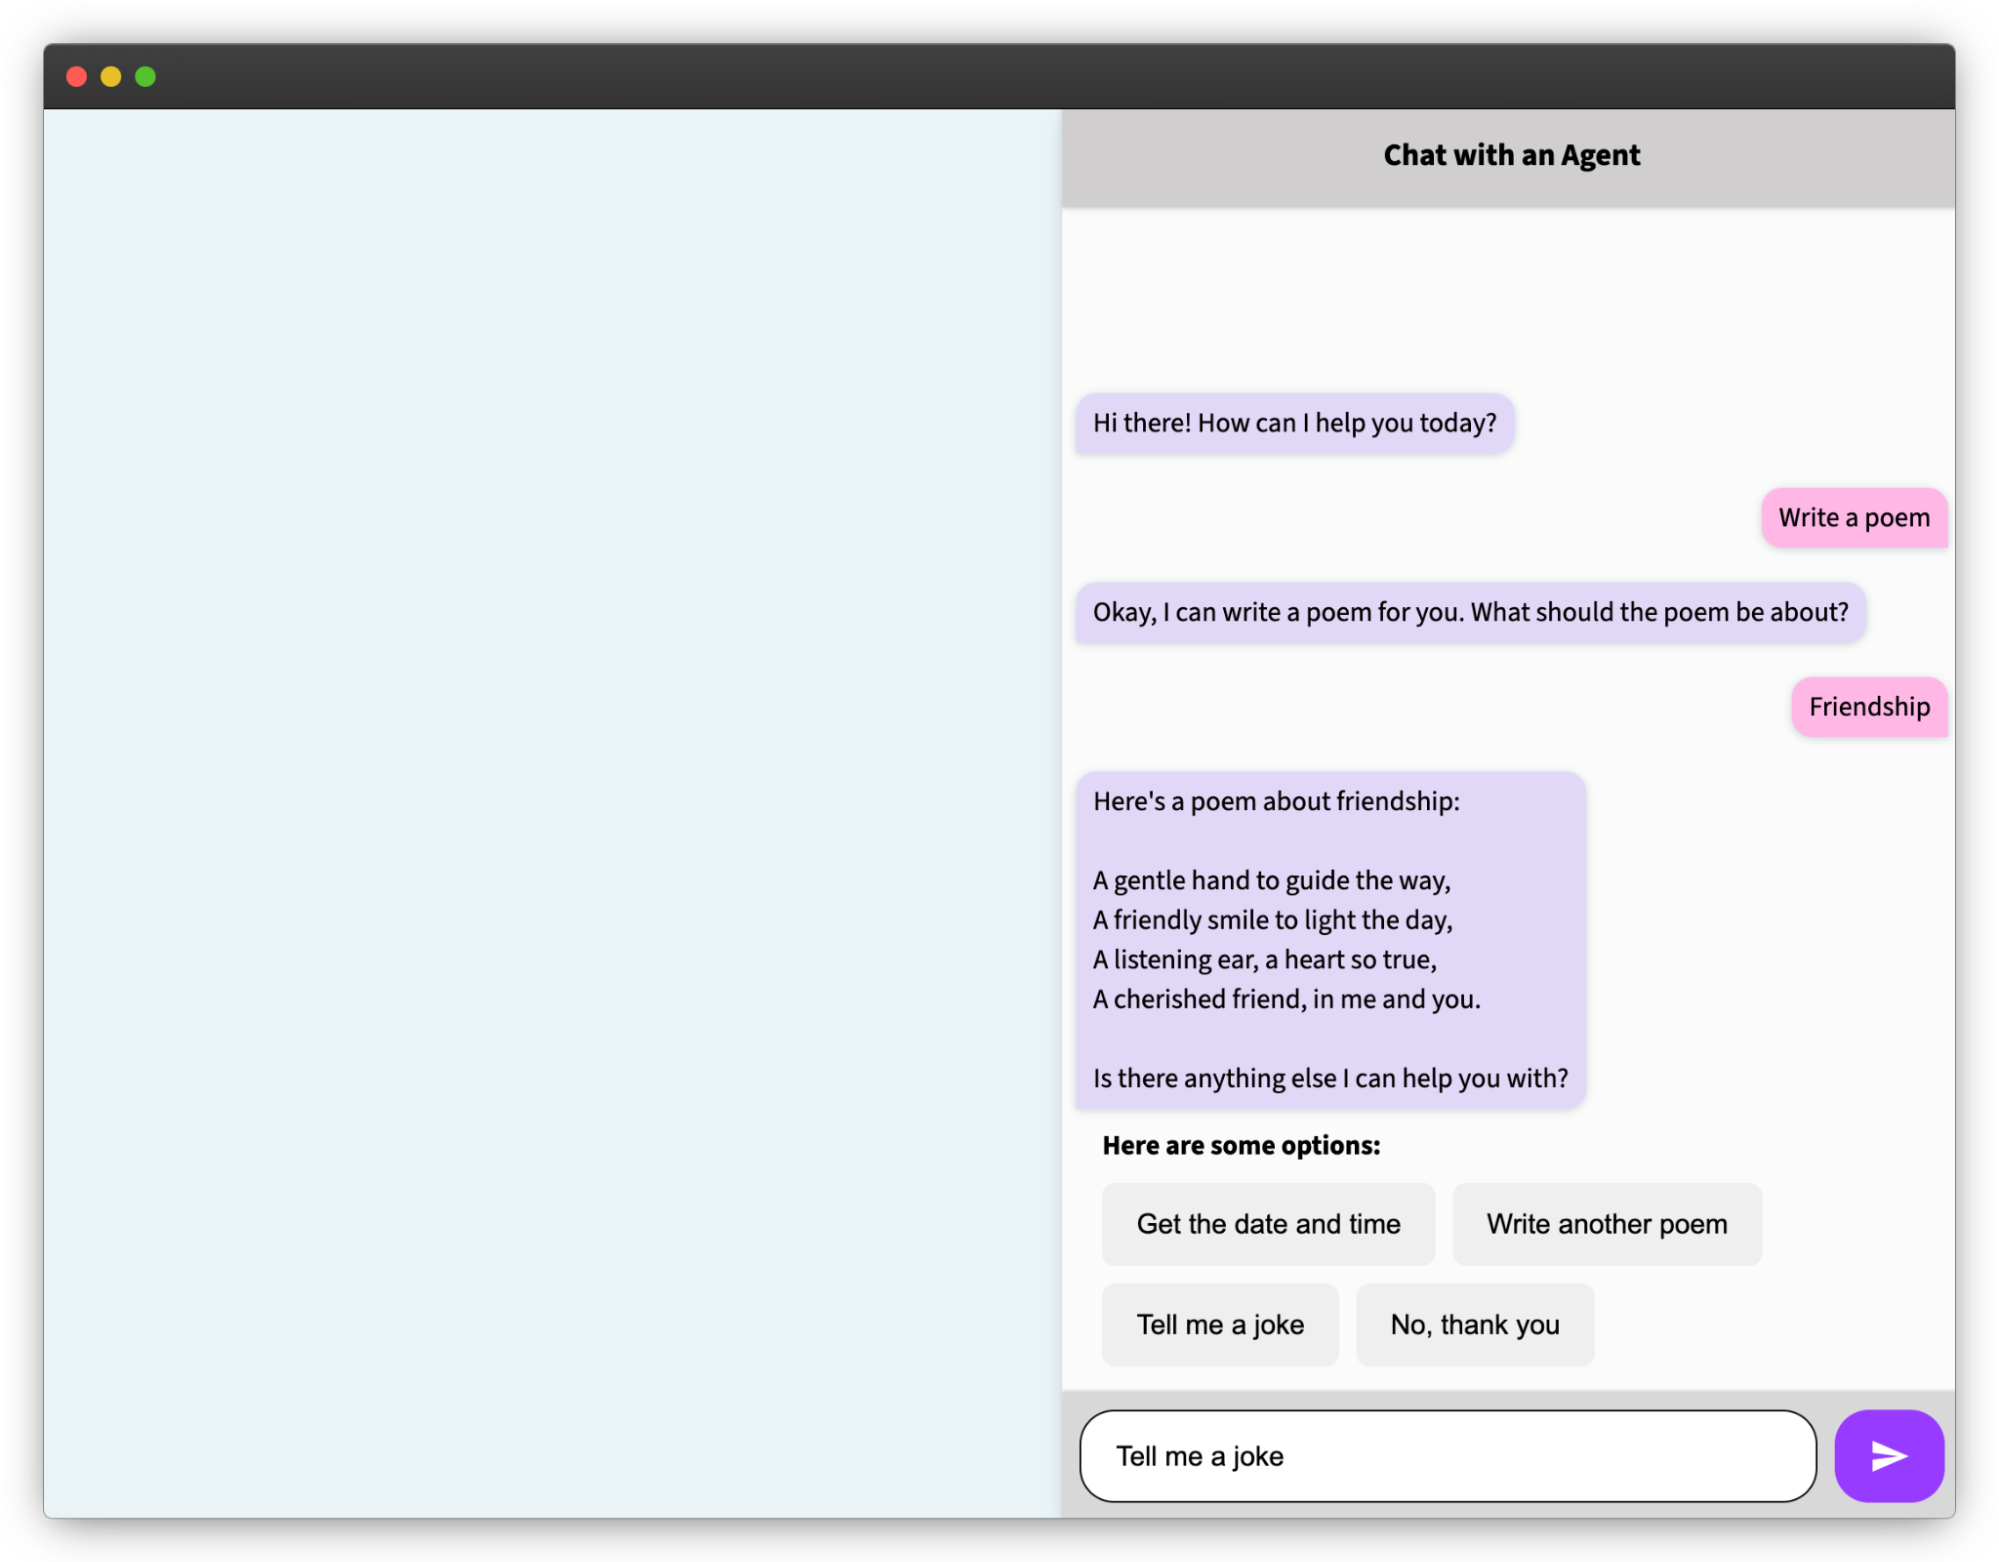
With the starter kit below, you can build something like this simple chatbot application that answers generic user questions and provides options to respond to the agent. However, you're not limited to chatbots! Genkit's input and output schemas are well-suited for sending and receiving structured data that can be incorporated into a client application however you see fit.
How Angular and Genkit work together
Steps to integrate Angular with Genkit:
-
Define a Genkit Flow: note the input and output schemas for use in your client application.
export const chatFlow = ai.defineFlow( { name: 'chatFlow', inputSchema: z.object({ userInput: z.string(), sessionId: z.string(), clearSession: z.boolean() }), outputSchema: z.object({ agentResponse: z.string(), options: z.optional(z.array(z.string())) }), }, async ({ userInput, sessionId, clearSession }) => { // Prompt definition and other instructions go here const { text } = await chat.send({ prompt }); return parse(maybeStripMarkdown(text)); } ); -
Add a server route exposing your flow: the
@genkit-ai/expresslibrary exposes anexpressHandlerutility, which simplifies the process. Exposing a Genkit flow in an Angular SSR application is as simple as adding the following line to yourserver.ts.app.post('/chatFlow', expressHandler(chatFlow)); -
Access Data in Angular client: combine the Genkit client's
runFlowutility with the Angular resource API to easily call your Genkit flow and work with the data returned in the response.agentResource = resource({ defaultValue: { agentResponse: '', options: [] }, request: () => this.userInput(), loader: ({request}): Promise=> { return runFlow({ url: ENDPOINT, input: { userInput: request, sessionId: this.sessionId(), clearSession: this.clearSession() }}); } });
Getting started
Want to try it out? We've developed a starter kit you can use to begin developing your own Angular app powered by Genkit. You'll need Node.js v20+ and npm, and then you can follow these steps to get started:
- Get an API key from Google AI Studio
-
After you've created an API key, set the
GEMINI_API_KEYenvironment variable to your key with the commandexport GEMINI_API_KEY=<your API key> -
Clone the starter kit repository with the following command
git clone git@github.com:angular/examples.git -
cd into the root folder (
cd genkit-angular-starter-kit) -
Install the dependencies with
npm install -
Serve the app with
ng serve - Navigate to the development server to use the application
What comes in the starter kit
This starter kit contains everything you need to create an application using Firebase Genkit with Angular to build your next great application.
The existing starter kit demonstrates how to use Genkit flows to create a persistent chat session with an agent. However, you can use the same patterns in this repository to create an application that runs any arbitrary Genkit flow you can dream up, which can leverage the full Genkit API (learn more).
The starter kit also comes with a sample tool that returns the current date and time. While this is a trivial example, it demonstrates the pattern for working with tools in Genkit that you can follow to perform more advanced actions, such as issuing API requests.
Explore and build
You can customize the application by updating the existing flow or even creating your own flows in src/flows.ts, then adding routes exposing your flows in src/server.ts. Then, you can integrate with the client by following the pattern shown in src/agent.service.ts.
Link to machine setup instructions
After you've cloned the starter kit, you just need Angular on your machine. If you haven't already, follow these Getting Started guides to get the right tools in place:
- Getting started with Angular
Register your app when you're finished!
We'd love to see what you build, so use this form to register your app after you're done.
More ways to learn
We've got a lot of resources to help you get started and grow with Angular and AI:
And if you find yourself stuck, connect with the other folks in the Angular community online and in person!